Level 59 · Dorayaki
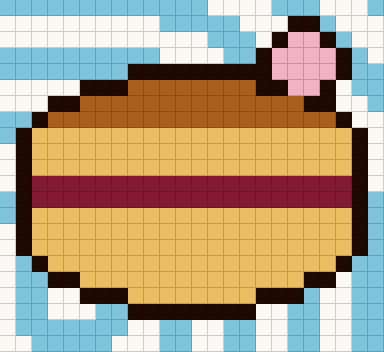
Dorayaki is level 59 of Crumb Colony. The pixel picture has 524 blocks in 7 colors, the tray holds 28 ant boxes, and the difficulty is Advanced.
- Difficulty
- Advanced
- Pacing
- Waves
- Blocks
- 524
- Colors
- 7
- Ant boxes
- 28
- Mechanics
- 3 chained pair(s) · 1 golden key(s) · Ice · Conveyor tray (every 3 taps)
About the dish
Japanese dorayaki: two fluffy honey pancakes sandwiching a layer of sweet red bean paste.
How the picture comes apart
From the frame to the center the picture is 11 layers deep. The outer ring is mostly light blue and white, the middle band is mostly tan and brown, and the core is mostly tan and dark red. Ants can only reach the next layer once the one around it is gone, so the core colors are the last to become useful.
By block count the biggest colors are tan, light blue and white.
The 1 golden key(s) are buried in the outer ring of the picture, so the locks they open come into play early.
10% of the blocks are frozen and take two bites each.
Reading the tray
The tray starts with 28 boxes in 4 columns. At the start 4 of the 4 front boxes can bite right away: white (bites now), white (bites now), light blue (bites now) and light blue (bites now).
Chained pairs start in column 1–2, row 2, column 1–2, row 3 and column 3–4, row 6.
Locked boxes start in column 4, row 3.
The tray is a conveyor: every 3 taps the front row shifts one column to the right, and the rightmost box wraps around to the left.
How the verified run plays out
The solution further down was played to the end in the real game, with ants walking and real timing. It takes 25 taps. The chart shows how many boxes were still parked in the 5 slots, waiting for their color, just before each tap.
Opening (taps 1–6): 34% of the blocks are eaten, with up to 4 of the 5 slots holding a box that is waiting.
Middle (taps 7–15): 33% of the blocks are eaten, with up to 1 of the 5 slots holding a box that is waiting.
Ending (taps 16–25): 33% of the blocks are eaten, with up to 0 of the 5 slots holding a box that is waiting.
A key comes out before tap 6. Chained pairs are taken at taps 3, 4 and 15.
How hard is it?
Two test players attempted this level many times: a cautious one that only sends colors it can use right away cleared it 59% of the time, and a look-ahead one that tries each option before committing cleared it 95% of the time. Most of their failed attempts jammed in the ending.
Strategy
Check the colors of the first three boxes in each column and compare them with the colors exposed on the outer ring of the picture. Always keep one slot free to catch a color that can't be eaten yet.
Pressure comes in waves: the opening and the ending are tight, the middle is a breather. Use the middle to clear slots and bring chained or locked boxes to the front.
Keys are buried in the picture and must be dug out to open the locks in the tray. Prioritize colors that eat around the keys so locked boxes don't block the front row for long.
Ice blocks take two bites, so one block uses two ants. Icy areas are eaten slowly and the matching boxes stay in their slots a little longer.
Chained boxes need both halves in the front row and two free slots. Take the boxes in front of them first and free two neighboring slots in advance.
The conveyor moves the front row one column to the right every few taps. Before a turn, take the color you need if it is about to slide away; a box you don't want yet may be moved aside for you. Locked boxes and chained pairs stay put.
Chained boxes · Locks and golden keys · Ice blocks · Conveyor tray · Difficulty curves
Step-by-step solution
This order of taps is verified to clear the level. Columns are numbered 1–4 from the left; after each tap, wait until the ants are out before the next one. Two boxes shown together are a chained pair taken in one tap.
Show the solution
- Column 213
- Column 164
- Column 113 + Column 222
- Column 119 + Column 219
- Column 312
- Column 320
- Column 33
- Column 312
- Column 315
- Column 416
- Column 42
- Column 428
- Column 422
- Column 454
- Column 323 + Column 422
- Column 112
- Column 233
- Column 214
- Column 334
- Column 410
- Column 139
- Column 212
- Column 115
- Column 123
- Column 27
Level 59 questions
How many taps does level 59 take?
The verified solution clears it in 25 taps, and 3 of them take a chained pair.
Where is level 59 hardest?
Most failed attempts jam in the ending. Tight, then loose, then tight; tidy the back rows during the calm.
Do I need boosters for level 59?
No. Every level, this one included, can be cleared without boosters, and the step-by-step solution on this page uses none. Each booster you use costs one of the three stars.