Level 63 · Pan de Muerto
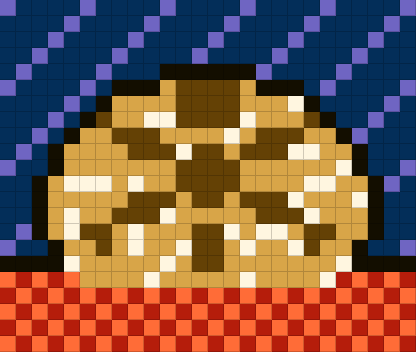
Pan de Muerto is level 63 of Crumb Colony. The pixel picture has 1287 blocks in 3 colors, the tray holds 70 ant boxes, and the difficulty is Hard.
- Difficulty
- Hard
- Pacing
- Hard opening
- Blocks
- 1287
- Colors
- 3
- Ant boxes
- 70
- Mechanics
- 6 chained pair(s) · Mystery boxes · Gift wrapping
Like this pixel picture? BitBead can turn it into a printable fuse bead pattern.
Play level 63About the dish
Pan de muerto, the sweet bread of Mexico's Day of the Dead, decorated with dough bones and dusted with sugar.
How the picture comes apart
From the frame to the center the picture is 17 layers deep. The outer ring is mostly navy and red, the middle band is mostly gold and brown, and the core is mostly brown and gold. Ants can only reach the next layer once the one around it is gone, so the core colors are the last to become useful.
By block count the biggest colors are navy, gold and brown.
The whole picture starts gift-wrapped in deep pink and light blue paper, with a green ribbon on top. The wrapping tears from the edges inward and the paper under the ribbon opens last; only uncovered blocks can be eaten.
Reading the tray
The tray starts with 70 boxes in 4 columns. At the start 1 of the 4 front boxes can bite right away: light blue (has to wait), salmon (has to wait), green (bites now) and blue (has to wait).
Chained pairs start in column 1–2, row 4, column 2–3, row 2, column 2–3, row 5, column 3–4, row 3, column 3–4, row 6 and column 3–4, row 7.
16 mystery box(es) only show their color when they reach the front.
How the verified run plays out
The solution further down was played to the end in the real game, with ants walking and real timing. It takes 64 taps. The chart shows how many boxes were still parked in the 5 slots, waiting for their color, just before each tap.
Opening (taps 1–28): 35% of the blocks are eaten, with up to 4 of the 5 slots holding a box that is waiting.
Middle (taps 29–49): 32% of the blocks are eaten, with up to 1 of the 5 slots holding a box that is waiting.
Ending (taps 50–64): 33% of the blocks are eaten, with up to 0 of the 5 slots holding a box that is waiting.
Chained pairs are taken at taps 5, 6, 13, 15, 16 and 17.
How hard is it?
Two test players attempted this level many times: a cautious one that only sends colors it can use right away cleared it 36% of the time, and a look-ahead one that tries each option before committing cleared it 55% of the time. Most of their failed attempts jammed in the opening.
Strategy
Check the colors of the first three boxes in each column and compare them with the colors exposed on the outer ring of the picture. Always keep one slot free to catch a color that can't be eaten yet.
The opening is the hardest part here: the outer ring needs several colors at once and the front rows are scrambled. Only send colors that can bite right away during the first taps, even if it feels slow.
Chained boxes need both halves in the front row and two free slots. Take the boxes in front of them first and free two neighboring slots in advance.
Mystery boxes show their color only when they reach the front. When you see one coming, don't fill every slot; leave room for it.
The whole picture starts gift-wrapped. The wrapping tears from the edges inward on its own, and only uncovered blocks can be eaten, so keep the unwrapping one step ahead of the eating. The ribbon is an extra layer: the paper under it stays shut until the ribbon is off, and that is where the level keeps its pressure.
Strategy guide: reading the tray and keeping the nest clear · Chained boxes · Gift wrapping · Difficulty curves
Step-by-step solution
This order of taps is verified to clear the level. Columns are numbered 1–4 from the left; after each tap, wait until the ants are out before the next one. Two boxes shown together are a chained pair taken in one tap.
Show the solution
- Column 3101
- Column 45
- Column 465
- Column 213
- Column 264 + Column 318
- Column 348 + Column 464
- Column 434
- Column 456
- Column 2111
- Column 153
- Column 156
- Column 165
- Column 140 + Column 248
- Column 341
- Column 245 + Column 37
- Column 361 + Column 439
- Column 344 + Column 462
- Column 454
- Column 439
- Column 417
- Column 466
- Column 422
- Column 422
- Column 332
- Column 254
- Column 230
- Column 248
- Column 227
- Column 144
- Column 414
- Column 444
- Column 442
- Column 4146
- Column 11
- Column 112
- Column 125
- Column 149
- Column 326
- Column 265
- Column 19
- Column 233
- Column 376
- Column 362
- Column 140
- Column 24
- Column 328
- Column 138
- Column 246
- Column 332
- Column 199
- Column 136
- Column 227
- Column 335
- Column 281
- Column 33
- Column 119
- Column 262
- Column 124
- Column 112
- Column 332
- Column 32
- Column 319
- Column 25
- Column 13
Level 63 questions
How many taps does level 63 take?
The verified solution clears it in 64 taps, and 6 of them take a chained pair.
Where is level 63 hardest?
Most failed attempts jam in the opening. Tough choices from the first taps, steady the start.
Do I need boosters for level 63?
No. Every level, this one included, can be cleared without boosters, and the step-by-step solution on this page uses none. Each booster you use costs one of the three stars.